
Configuring a "Lookup" field
Setting up a lookup allows you to retrieve and copy data from other apps.
For example, if you set up a lookup in an order management app that references a product management app, you can copy product information. This eliminates duplicate data entry and prevents input errors.
Reference: What is Lookup?
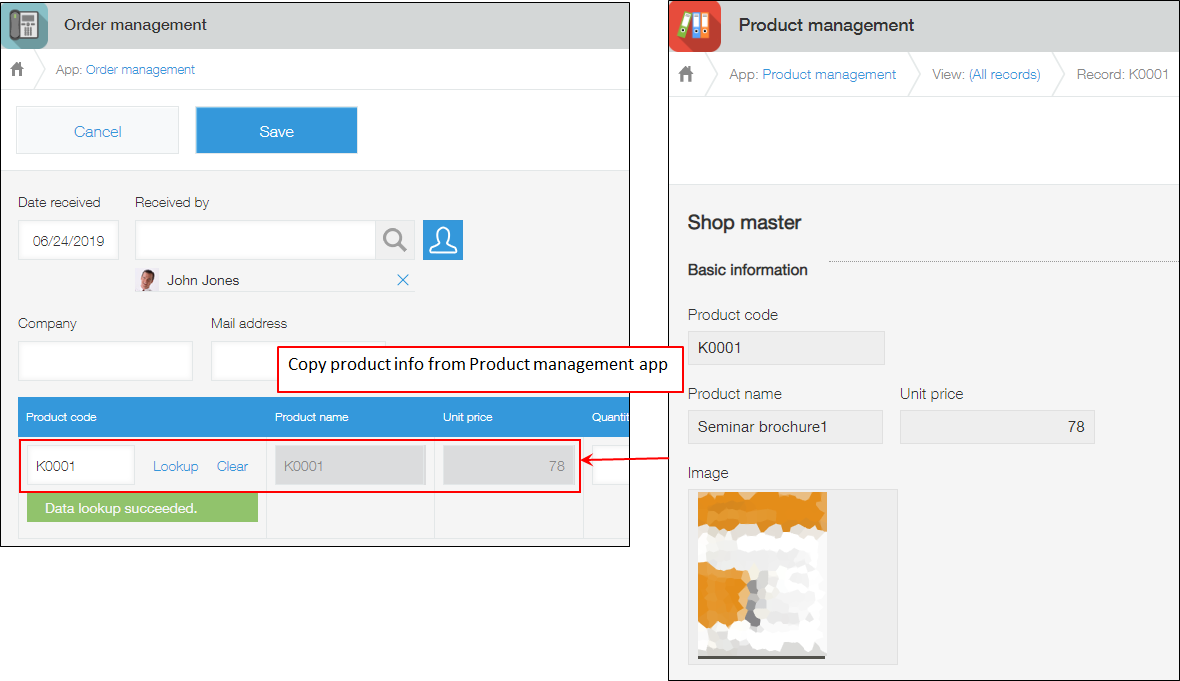
Basics of lookup
To set up a lookup, you need two apps: one as a datasource and another to retrieve data from it.
-
Create an app used as a datasource
You need a field to be used as a key for relating apps. -
Place a Lookup field in the app that retrieves data from the datasource app
Configure the connection with the datasource app in the Lookup field.
For details on the setting items of the Lookup field, refer to the following page.
"Lookup" field settings -
Verify that the apps are connected correctly
Open the New record screen and verify that you can retrieve data from the datasource app using the lookup.
For details on how to use a lookup, refer to the following page.
Using lookup
Example of setting up a "Lookup" field
This section uses actual apps to describe the steps to configure a lookup. In this example, the "Order management" app and "Product management" app are used.
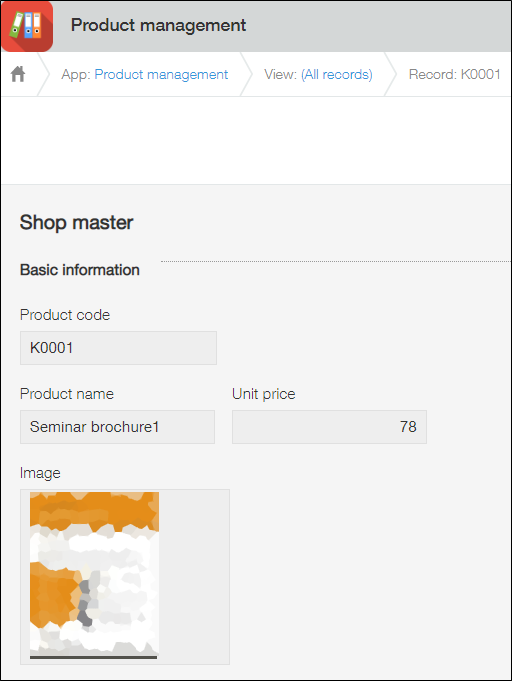
Register data to the datasource app
To retrieve data of the "Product management" app (the datasource app) in the "Order management" app, you must register data that serves as a source in the "Product management" app beforehand.
In this example, the "Product code" and "Product name" are created using Text fields, and the "Unit price" is created using a Number field. Data is then registered in these fields. You can optionally place other fields on the form.
Configure a "Lookup" field
Next, place a Lookup field in the "Order management" app, which will retrieve data from the other app.
-
Open the "Order management" app.
-
Click the App settings icon (the gear-shaped icon) at the upper right of the View screen.

-
On the App settings screen, click the Form tab.
-
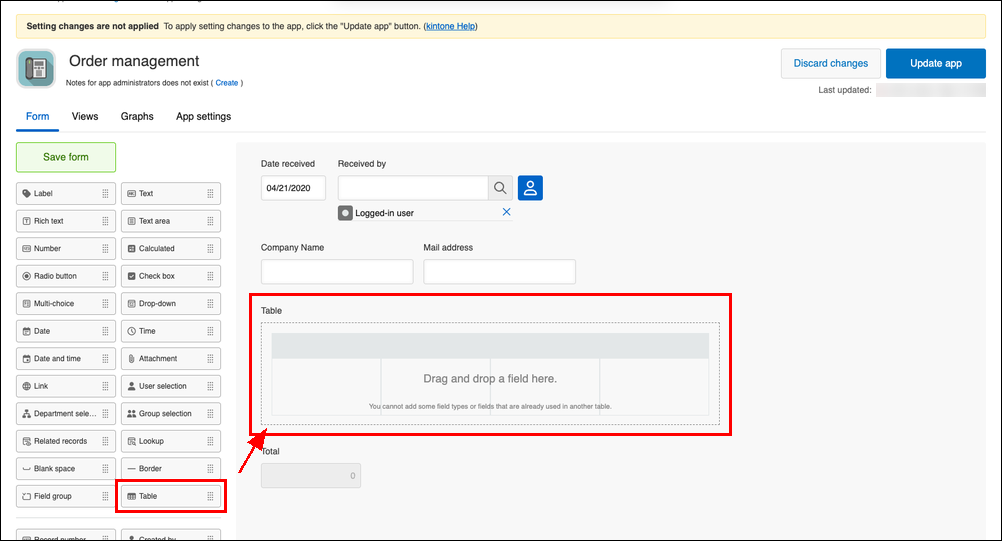
Place a Table field on the app form.
-
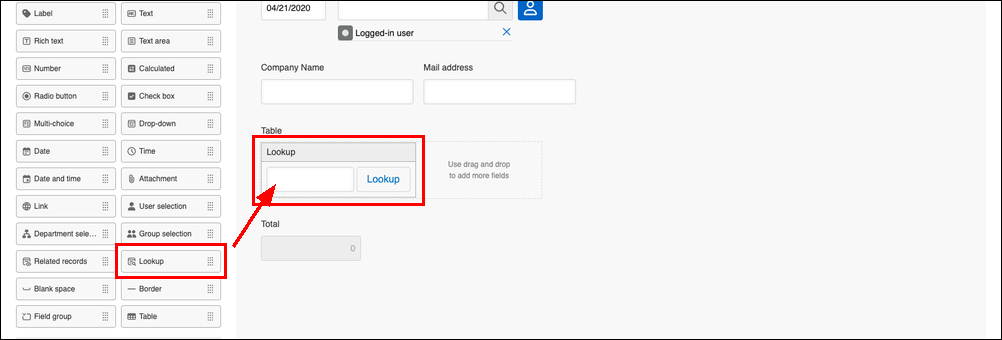
Drag and drop a Lookup field on the table.
In this example, you will configure a Lookup field that retrieves information based on product codes.
-
Also add the fields you want to retrieve from the "Product management" app to the Table.
In this example, add the following fields:- Product Name: Text field
- Unit Price: Number field
- Quantity: Number field
- Subtotal: Calculated field
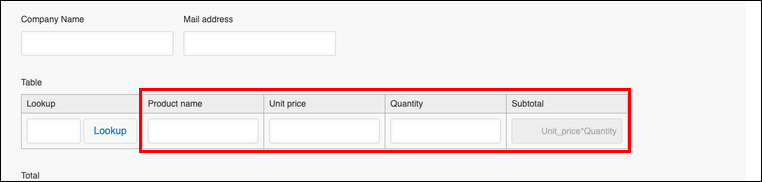
-
Hover over the Settings icon (the gear icon) in the upper right corner of the Lookup field, and click Settings.
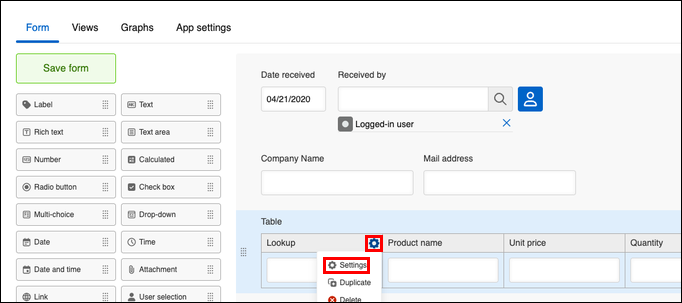
-
Configure the following settings.
- Set Name.
In this example, enter "Product code". - Select Datasource app.
Select the app to use as the data source (reference source). In this example, select the "Product management" app. - Select Key field.
Select the field you want to use as the association key. In this example, select the "Product code" field.
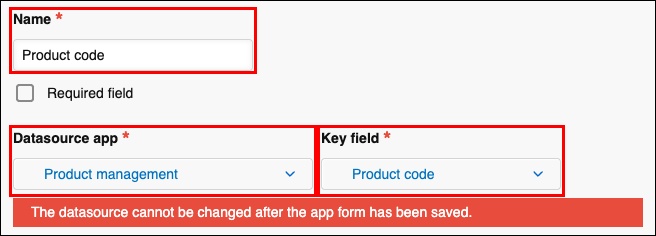
- Set Name.
-
This setting specifies the search method for retrieving product code information.
Make sure that Enable partial match search (Recommended) is selected.
For details, refer to the following page:
Partial Match Search for Alphanumeric Product Codes
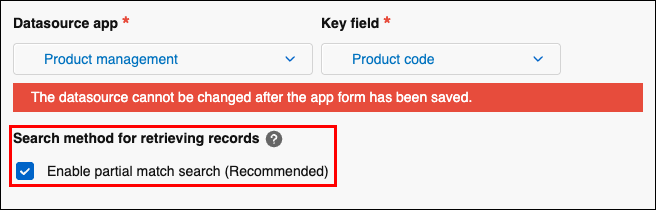
-
Select Field mappings.
You can retrieve data from multiple fields at once in the app used as master data (reference source).
In this example, select "Product Name" < "[Product management]Product Name" and "Unit price" < "[Product management]Unit price".
Click the Add button (the plus sign-shaped icon) to add as many field mappings as you need.

-
If necessary, select fields for Fields shown in Lookup picker.
Fields specified here are displayed on the screen to select which record you want to retrieve data from. These fields help you identify the correct record when there are multiple records with the same product code.
In this example, select "Product name" and "Unit price." For details, refer to the following page:
Using lookup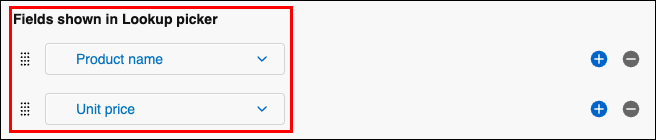
-
If necessary, also configure the following:
-
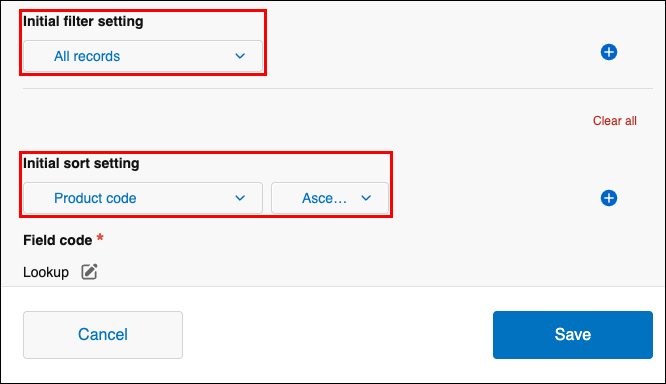
Specify Initial filter setting.
This filter setting will be applied to help users select a record appropriately. From the dropdown, select a field to which the condition is to be applied, and then specify the filter condition. In this example, you will not configure the initial filter setting since you want all records to be displayed.
Even if you have configured the initial filter setting, it is not applied when only one record matches the keyword entered into the Lookup field. In such a case, the information in the record is retrieved directly without the filter being applied. -
Specify Initial sort setting.
Specify the display order of records to be retrieved. In this example, select "Product code" and Ascending.
-
-
Click Save.
-
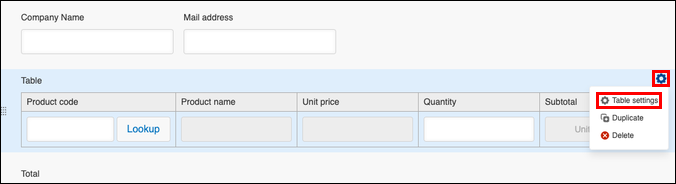
To set the Table name, click the Settings icon (the gear icon) in the upper right corner of Table, and click Table settings.
-
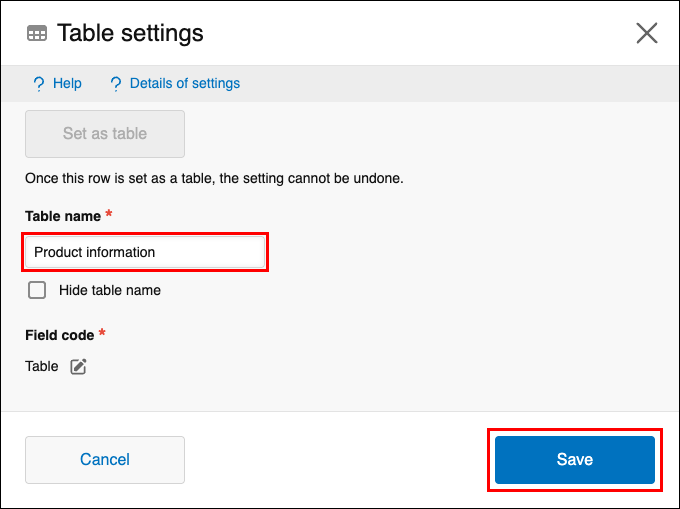
Enter a table name and click Save.
In this example, enter "Product information".
-
Click Save form on the upper left side of the screen.
-
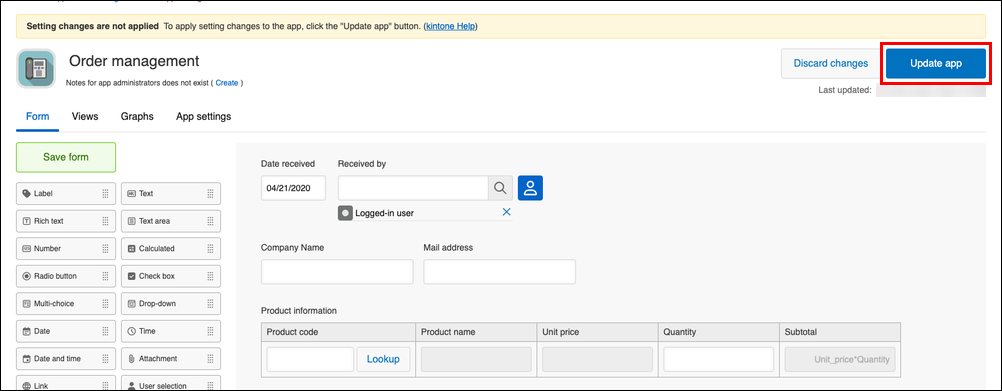
Click Update app at the upper right of the screen.
-
On the Update app dialog, click Update app.
This completes the lookup setup.
When placing a "Lookup" field outside a "Table"
You can also place a Lookup field outside a Table. In this case, in the Field mappings settings, you cannot specify a field in the Table as the copy destination for retrieved data.
Other lookup setting examples
You can use Field mappings in Lookup settings to retrieve data from Multi-choice, Checkbox, Drop-down, and other fields.
This example shows how to copy the following information from the Customer Database app to the Lead Management app.
- Product Name (A Multi-choice field)
- Options (A Check box field)
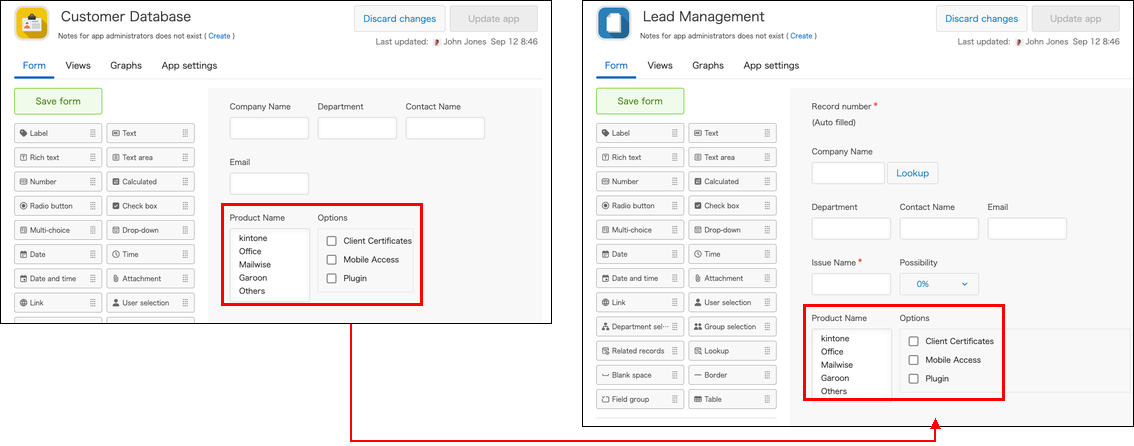
Both the Customer Database app and the Lead Management app store company names.
This example uses the company name as an association key to retrieve product and option information.
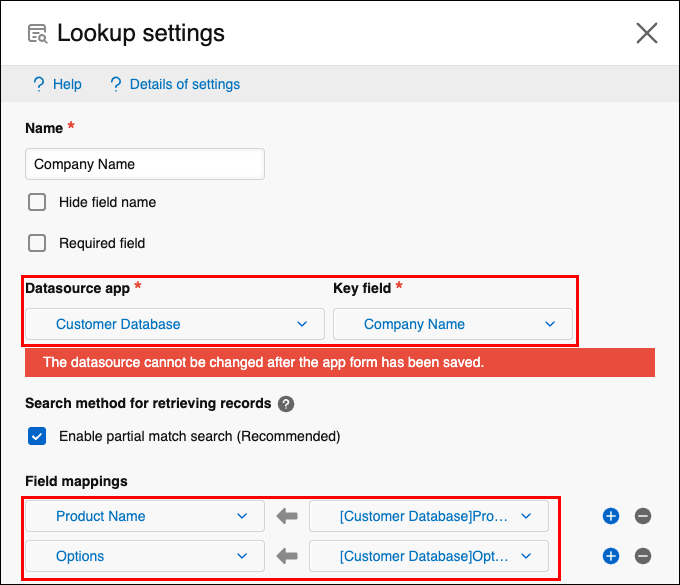
In the Lead Management app, add a Lookup field for the company name, and configure it as follows.
| Datasource app | Key field |
|---|---|
| Customer Database | Company |
| Field mappings (Fields to which data is copied) | Field mappings (Fields from which data is copied) |
|---|---|
| Product Name | [Customer Database] Product Name |
| Options (Only available in Japanese) | [Customer Database] Options |
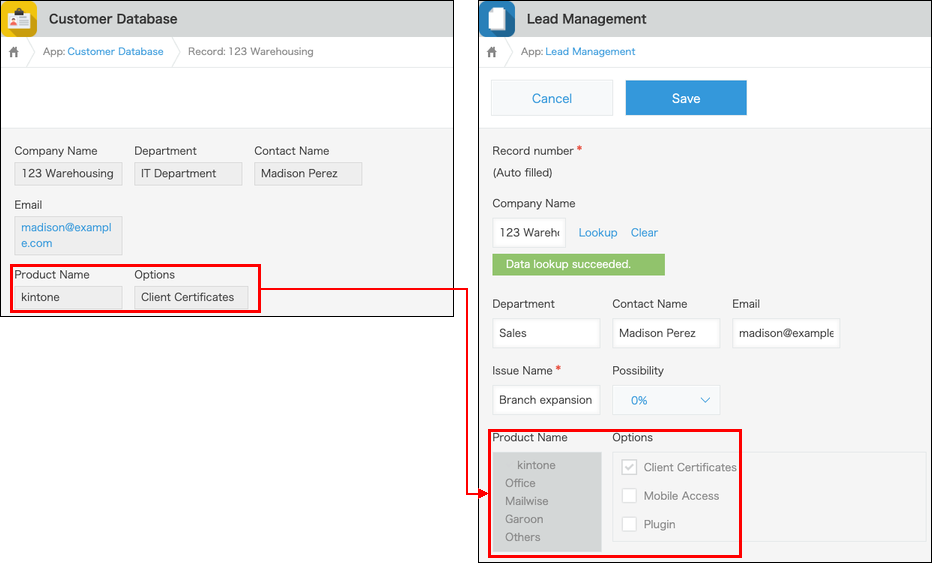
Now, by entering a company name in the "Lead Management" app and clicking Lookup, you can retrieve product names and options from the "Customer Database" app.
Notes about "Lookup" fields
- Even if records in the app used as master data (reference source) are changed, values retrieved by lookup remain unchanged. They are not updated automatically.
If you click Lookup again, they are overwritten with the latest values. - Importing a CSV file is a convenient way to bulk update existing records.
However, if the value in the field selected for Key field is duplicated in the app used as master data (reference source), the file import cannot identify the target record, so the value cannot be updated.
To update such values, update each record on the record edit screen. - You cannot specify fields in a Table in the app used as master data (reference source) as the copy source for Key field or Field mappings.
- Even if you change the setting in the Lookup field, values in the following fields of existing records do not change.
- Fields specified for Field mappings in the Lookup settings screen
- If you select the Enable partial match search (Recommended) checkbox in the Lookup field settings, it may take some time to filter the information of the latest records. For details, refer to the following page:
Records are not filtered correctly even after enabling partial match search in the Lookup settings